Using the Prologix GPIB-USB adapter

Device Setup
If the adapter is not present after refreshing the Hardware Devices menu, follow the instructions specific to your OS below. The instructions below contain guides for two driver types: VCP and D2XX. VCP is Virtual COM Port which is the type you should use. Flojoy does not support the D2XX driver. The VCP driver is included in the Linux kernel and is not available for download from FTDI. Please contact Prologix for device support if the driver is not installed on Linux.

Windows
Unplug adapter from PC and Instrument. Plug adapter into PC with a USB cable. One of the two red lights should be on.
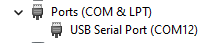
Driver should automatically install and the adapter should show as a “USB Serial Port” in Device Manager. Remember the COM number for later. If the driver is not properly installed, the driver can be downloaded here (). Follow the installation instructions here (https://www.ftdichip.com/old2020/Support/Documents/InstallGuides/AN_396%20FTDI%20Drivers%20Installation%20Guide%20for%20Windows%2010.pdf).
Mac
Unplug adapter from PC and Instrument. Plug adapter into PC with a USB cable. One of the two red lights should be on.
Driver should automatically install and the adapter should show in “Settings → About → System Report → Hardware → USB” as a Prologix GPIB-USB Controller. If the driver is not properly installed, the driver can be downloaded here (https://www.ftdichip.com/old2020/Drivers/VCP.htm). Follow the installation instructions here (https://www.ftdichip.com/old2020/Support/Documents/AppNotes/AN_134_FTDI_Drivers_Installation_Guide_for_MAC_OSX.pdf).

Linux
The VCP driver is included in the Linux kernel and is not available for download from FTDI. Please contact Prologix for device support if the driver is not installed on Linux.
However, you may have to add yourself (or the user), to a couple “Groups” for permission reasons. In Flojoy’s Hardware Devices, if the list of devices is not loading and is stuck on loading…, you likely have to follow these instructions.

In the Terminal use groups to see the groups you are in. You need to be in tty and/or dialout groups. To add yourself to a group use sudo usermod -a -G <group_name> <user_name>, replacing <group_name> with either tty or dialout and <user_name> with your user name. Add tty first, restart the computer and see if Hardware Devices is still stuck loading. Add dialout if it is still not loading. The adapter should show up with the full name.

Setup in Flojoy
It appears it is best to have the adapter in TALK mode before connecting to the instrument. To accomplish this run the Prologix setup app in Flojoy. This app sets up the necessary settings to control a VISA device. After running the app you can connect the adapter to the instrument.

Use of the adapter
After setting up the adapter, you can use the SERIAL WRITE block to send commands to the instrument. Alternatively there may be some instrument blocks that use Serial to communicate (e.g. the Agilent 33120a).
- Any command without a “++” prefix will be sent to the connected instrument.
SERIAL WRITEcommands should be appended by LF (line-feed, AKA new line).- Ensure the GPIB addresses for the Prologix and the instrument match.
- The
PROLOGIX_READblock should be used after sending a query (e.g. “*IDN?”) rather thanSERIAL_READ. - You can set
PROLOGIX_AUTOto expect a query response after every command. However, this can cause errors in some instruments.